Overview
This guide explains how to create and configure an OpenID Connect (OIDC) application integration in Okta for Softdrive. The configuration creates a Softdrive application tile in Okta and allows assigned users to initiate authentication from either Okta or Softdrive.
Applies To
- Softdrive
- Softdrive Launcher
- Okta Identity Provider
- OpenID Connect (OIDC) authentication
Prerequisites
Before beginning, make sure you have the following:
- Administrative access to your Okta organization.
- The Softdrive frontend URL provided for your environment.
- At least one Okta test user or group that can be assigned to the application.
- Federation Broker Mode disabled if explicit user or group assignments are required.
Procedure
Step 1: Create the App Integration
- Sign in to the Okta Admin Console.
- Navigate to Applications and Resources ->Applications.
- Click Create App Integration.
- When prompted to select the application creation experience, choose Classic experience.
- For Sign-in method, select OIDC - OpenID Connect.
- For Application type, select Web Application.
- Click Next.
Step 2: Configure General Settings
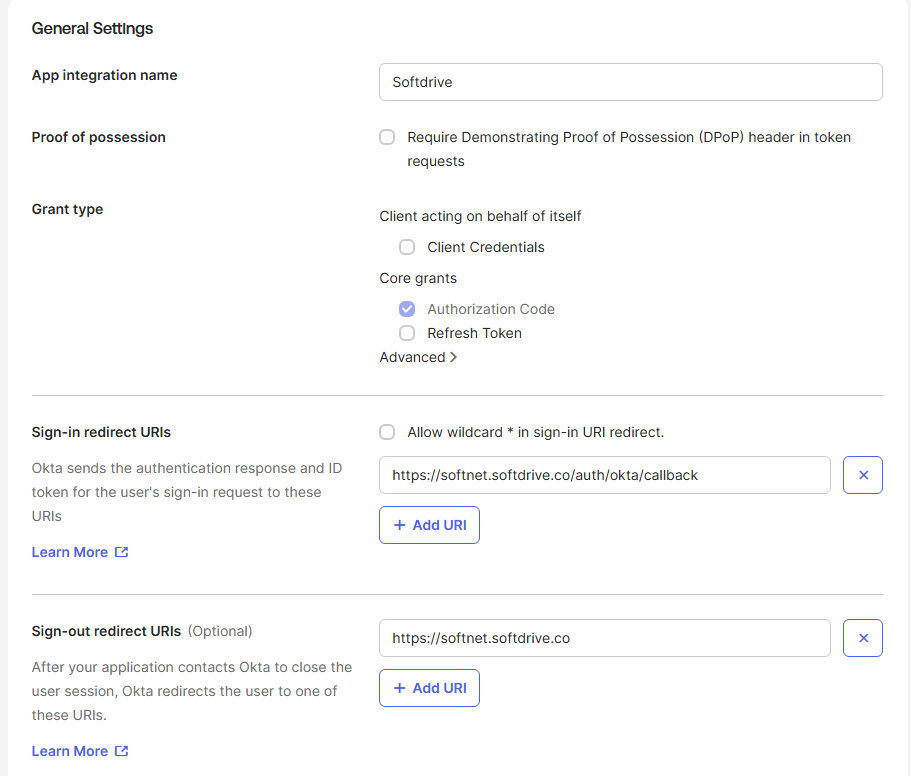
Configure the new application using the following settings:
- App integration name: Enter a recognizable name, such as Softdrive Launcher.
- Grant type: Select Authorization Code. Leave the default PKCE configuration unchanged.
- Sign-in redirect URI:
https://softnet.softdrive.co/auth/okta/callback - Sign-out redirect URI: Optional. This can be left blank unless a specific sign-out redirect has been provided.
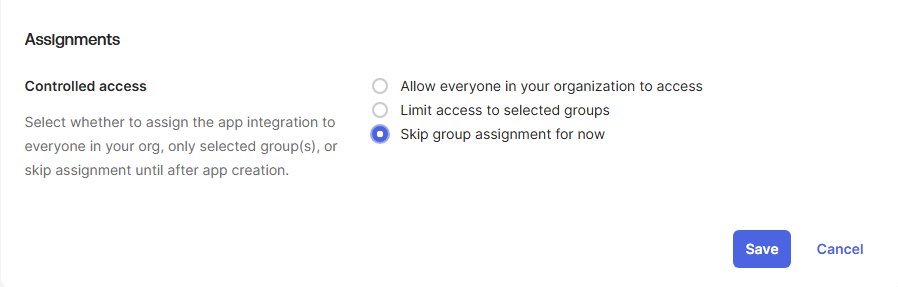
- Assignments: Select Skip group assignment for now. Users or groups will be assigned manually after the application has been created.
Click Save to create the application.
Step 3: Copy the Okta Application Credentials
After creating the application, open the General tab and locate the client credentials. The following information is required to configure the Okta integration in Softdrive:
- Client ID
- Client Secret
- Okta Domain — your organization's Okta hostname, for example:
trial-xxxx.okta.com - UserInfo Endpoint
For an Okta organization authorization server, the UserInfo endpoint is typically:
https://<your-okta-domain>/oauth2/v1/userinfo
If your organization uses the default custom Authorization Server, the endpoint is typically:
https://<your-okta-domain>/oauth2/default/v1/userinfo
Important: Store the Client Secret securely. Do not share the Client Secret through unsecured email, chat, tickets, or documentation.
Step 4: Configure the Okta Application Tile
- Open the General tab for the newly created application.
- Locate the General Settings section and click Edit or the pencil icon.
- Locate the LOGIN section.
- For Login initiated by, open the dropdown and select Either Okta or App.
- Do not select App Only.
- Selecting Either Okta or App allows users to initiate the login process from the Okta application tile or from Softdrive.
- Under Application visibility, enable Display application icon to users.
- For Login flow, select Redirect to app to initiate login (OIDC Compliant).
- For Initiate Login URI, enter one of the following URLs depending on where users should be redirected after selecting the Softdrive tile in Okta:
Option 1 - Redirect users directly to the Softdrive Launcher
Use the following URI if users should be redirected directly to the Softdrive Launcher:
https://softnet.softdrive.co/auth/okta/initiate?organizationId=xxxxxxxx-xxxx-xxxx-xxxx-xxxxxxxxxxxx&target=launcher
Option 2 - Redirect users to the Softnet web dashboard
Use the following URI if users should be redirected to the Softnet web dashboard:
https://softnet.softdrive.co/auth/okta/initiate?organizationId=xxxxxxxx-xxxx-xxxx-xxxx-xxxxxxxxxxxx&target=softnet
Find Your Softnet Organization ID
The organizationId is unique to your Softdrive organization. You can find it in the URL while signed in to the Softnet dashboard.
For example, your Softnet URL may look similar to:
https://softnet.softdrive.co/organization/c685a4d1-abd5-4736-9b4f-0cc1866d7de6/computers
In this example, the Organization ID is:
c685a4d1-abd5-4736-9b4f-0cc1866d7de6
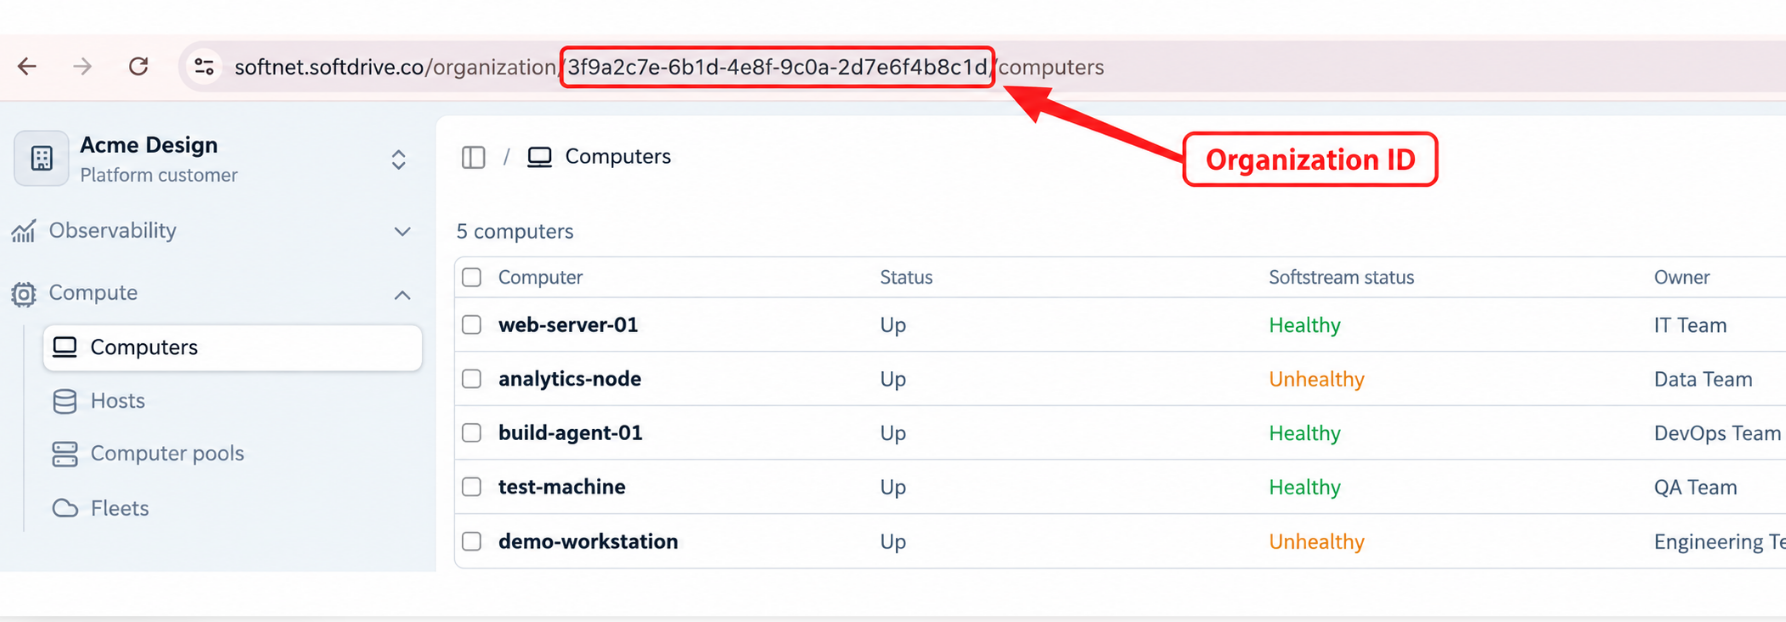
Copy the value located between /organization/ and the next / in the Softnet URL, and use it to replace the placeholder in the Initiate Login URI.
Example - Softnet dashboard:
https://softnet.softdrive.co/auth/okta/initiate?organizationId=c685a4d1-abd5-4736-9b4f-0cc1866d7de6&target=softnet
Example - Softdrive Launcher:
https://softnet.softdrive.co/auth/okta/initiate?organizationId=c685a4d1-abd5-4736-9b4f-0cc1866d7de6&target=launcher
- After entering the appropriate Initiate Login URI, click Save.
Important: Make sure the correct Organization ID is used in the Initiate Login URI. The target=softnet option redirects the user to the Softnet web dashboard, while target=launcher redirects the user directly to the Softdrive Launcher.
Important: The Login initiated by setting must be configured as Either Okta or App. This option also makes the application visibility and OIDC login flow settings available for the Softdrive application tile.
Step 5: Assign Users or Groups
- Open the Assignments tab.
- Click Assign.
- Choose whether to assign individual users or groups.
- Assign the appropriate test user(s) or group(s) to the Softdrive application.
- Confirm and save the assignments.
Only users who are appropriately assigned to the application will be able to access it when explicit application assignments are being used. Once assigned, Softdrive should appear automatically as a tile in My Apps.
Step 6: Customize the Softdrive Application Icon
After creating the application, you can replace the default Okta application icon with the Softdrive logo. This makes the Softdrive application easier for users to identify from their My Apps dashboard.
- Download the Softdrive application icon using the link below:
- In the Okta Admin Console, navigate to Applications and Resources → Applications.
- Open the Softdrive application that you created.
- At the top of the application page, locate the current application icon next to the application name.
- Click the pencil (Edit) icon displayed on the application icon.
- Upload the Softdrive icon downloaded in Step 1.
- Save the changes.
- Open or refresh the Okta My Apps dashboard and verify that the Softdrive application tile now displays the Softdrive icon.
Expected Result: The Softdrive logo should appear as the application icon in Okta and on the Softdrive tile available to assigned users in My Apps.
Step 7: Verify the Application
After completing the configuration:
- Open the application in the Okta Admin Console.
- Verify that the application status displays Active.
- Sign in to Okta as an assigned test user.
- Verify that the Softdrive Launcher application tile appears on the user's Okta dashboard.
- Select the tile and confirm that the user is redirected to Softdrive to begin the authentication process.
Expected Result
The Softdrive application should appear as an application tile for assigned Okta users. Selecting the tile should redirect the user to the configured Softdrive login endpoint and initiate the OIDC authentication process.
Troubleshooting
- Softdrive tile does not appear: Confirm that Display application icon to users is enabled and that the affected user or group is assigned to the application.
- User is not assigned: Open the Assignments tab and confirm that the user or one of their groups has been assigned.
- Redirect URI error: Confirm that the Sign-in redirect URI configured in Okta exactly matches the Softdrive callback URL provided for your environment.
- Tile opens but authentication does not start: Verify that the Initiate Login URI is correct and that Redirect to app to initiate login (OIDC Compliant) is selected.
- Authentication succeeds in Okta but fails in Softdrive: Verify the Client ID, Client Secret, Okta Domain, UserInfo endpoint, and corresponding Softdrive Okta configuration.
If the issue continues after verifying these settings, contact the Softdrive Support Team for assistance.