Overview
This guide walks through creating a Windows provisioning package (.PPKG) using Windows Configuration Designer (WCD). The package can be used during imaging or first boot (OOBE) to automatically configure and join devices to either Microsoft Entra ID (formerly Azure AD) or an on-premises Active Directory domain. Microsoft Entra ID deployments can also optionally include Intune enrollment.
Applies To
- Windows 10 and Windows 11
- Microsoft Entra ID (formerly Azure AD)
- On-premises Active Directory
- Microsoft Intune Enrollment (optional for Microsoft Entra ID deployments)
- Softdrive provisioning workflows
Prerequisites
- A Windows PC to build the provisioning package
- For Microsoft Entra ID deployments, device join must be allowed by the organization's Microsoft Entra policies
- If using Intune, appropriate licensing and enrollment configuration must be enabled
- For on-premises Active Directory deployments, a domain account with permission to join computers to the domain is required
- For on-premises Active Directory deployments, the computer must have network connectivity and DNS resolution to a writable domain controller when the provisioning package is applied
Procedure
- Install Windows Configuration Designer
- Download the Windows ADK from: https://learn.microsoft.com/en-us/windows-hardware/get-started/adk-install
- Run adksetup.exe and install Windows Configuration Designer
- On the feature selection screen, select Windows Configuration Designer

- Create a new provisioning project
- Open Windows Configuration Designer
- Click "Provision desktop devices"
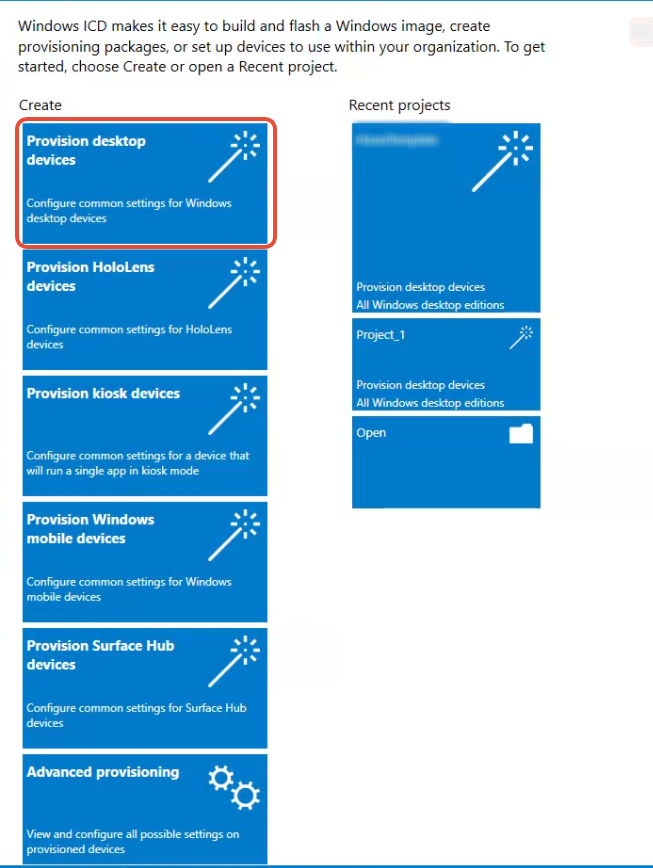
- Give your project a descriptive name (example: AutoJoin-Entra or AutoJoin-AD)
- Click Next until reaching the main editor
- Configure device settings

- Set the device name using a naming pattern
- Examples: COMP-%SERIAL%, VDI-%RAND:5%, SOFTDRIVE-%RAND:6%
- (Optional) Enter a product key if upgrading Windows edition
- Leave shared device mode set to No for most Softdrive environments
- Configure account management

Important: The screenshot above shows Enroll in Azure AD selected. Azure AD has since been renamed to Microsoft Entra ID. If the computer will instead join a traditional on-premises Active Directory domain, select Enroll into Active Directory. Only one of these options should be selected based on the organization's intended join type.
- For Microsoft Entra ID: Select Enroll in Azure AD (Microsoft Entra ID).
- Select Get Bulk Token and sign in with an account that has permission to join devices to Microsoft Entra ID when prompted.
- Configure the bulk token expiration according to your deployment requirements.
- This allows the provisioning package to automatically join the computer to Microsoft Entra ID when the package is applied.
- For on-premises Active Directory: Select Enroll into Active Directory.
- Enter the Active Directory domain information and credentials for an account that has permission to join computers to the domain.
- The deployed computer must be able to resolve the Active Directory domain through DNS and communicate with a domain controller when the provisioning package is applied.
- Build the provisioning package
- Set Owner to IT Admin and version to 1.0
- Choose to sign the package or protect it with a password
- Click Build to generate the .ppkg file
- The package can be applied during imaging or first boot
Expected Result
When the provisioning package is applied, the computer is automatically configured and joined according to the account management option selected when the PPKG was created. Microsoft Entra ID packages join the computer to the configured Microsoft Entra tenant and may optionally enroll the device in Intune. On-premises Active Directory packages join the computer to the configured Active Directory domain when DNS and domain controller connectivity are available.
Troubleshooting
- Ensure the Windows Configuration Designer/ADK version is appropriate for the Windows version being deployed
- For Microsoft Entra ID deployments, verify that device join policies allow enrollment and that the bulk token has not expired
- If using Intune, confirm the appropriate Intune enrollment configuration is enabled
- For on-premises Active Directory deployments, verify that the computer is using the correct DNS servers and can locate a writable domain controller
- For on-premises Active Directory deployments, confirm that the account used in the provisioning package has permission to join computers to the domain
- Validate the credentials or enrollment information used when creating the provisioning package