Overview
In some Softdrive Windows virtual machines (oVirt), administrators may expand disk storage at the hypervisor level but then discover that the C: drive cannot be extended inside Windows.
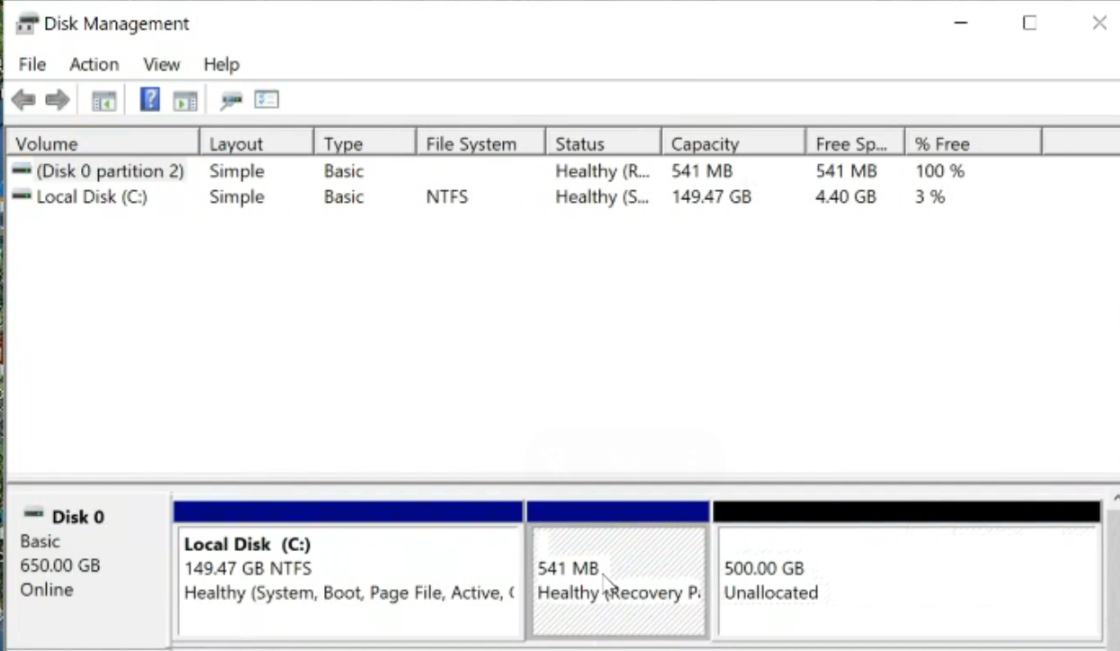
This typically occurs because a Windows Recovery partition exists between the C: partition and the newly added Unallocated space.
Since Windows Disk Management cannot move partitions, the Extend Volume option becomes unavailable.
Applies To
- Softdrive Windows Virtual Machines
- oVirt-based deployments
- Windows 10 / Windows 11
- Disk expansion scenarios
Prerequisites
- Administrator access to the virtual machine
- Recently expanded virtual disk
- Access to Command Prompt and Disk Management
- Recommended: VM snapshot before making partition changes
Symptoms
- The additional disk space appears as Unallocated
- Extend Volume is grayed out on the C: drive
- A Recovery Partition appears between C: and the unallocated space
Procedure
Important Notes Before Proceeding
- Recommended: Create a VM snapshot before modifying partitions
- You must be logged in as a local Administrator
- If BitLocker is enabled, suspend protection first:
manage-bde -protectors -disable C:
Resolution Option A (Recommended)
The most common solution is to remove the Recovery partition temporarily, extend the C: drive, and optionally recreate the Recovery partition later.
Step 1: Disable Windows Recovery Environment (WinRE)
Open Command Prompt as Administrator and run:
reagentc /disableVerify WinRE status:
reagentc /infoExpected:
Windows RE status: DisabledStep 2: Delete the Recovery Partition
Disk Management cannot remove protected recovery partitions, so use DiskPart:
diskpart
list disk
select disk 0
list partition
Identify the Recovery partition (usually 500–600 MB), then run:
select partition <number>
delete partition override
exit
Step 3: Extend the C: Drive
- Open Disk Management
- Right-click the C: drive
- Select Extend Volume
- Use the available unallocated space
- Complete the wizard
Optional: Recreate the Recovery Partition
The Windows Recovery partition is not required for normal operation in most managed virtual desktop environments. However, it can be recreated later if needed.
Optional Recovery Partition Recreation Steps
- Shrink the C: drive by 600–1024 MB
- Create a new NTFS partition in the free space
- Re-enable WinRE:
reagentc /enable
reagentc /info
Expected Result
The C: drive is successfully extended using the newly allocated storage space, and Windows recognizes the full disk capacity.
Troubleshooting
- If
reagentc /enablefails, verify there is enough free space for the recovery partition - If BitLocker was suspended, re-enable it afterward:
manage-bde -protectors -enable C: - If Extend Volume remains unavailable, confirm the Recovery partition was removed successfully
- Third-party partition tools may be required if partitions cannot be modified normally
- If the issue persists, contact support@softdrive.co
Support Recommendations
- Right-size disks during initial provisioning whenever possible
- Use standardized templates with Recovery partitions placed before the OS partition
- Consider using separate data disks for future storage growth